Before you proceed into the opening of your blog, it is important to think on what you will talk and why you want to blog? You need to properly frame your approach, otherwise, you will go in all directions and stop quickly.
The purpose of a blog was never, in a logic, for making money with advertissements or promoting your services. If this should happen, it will happen naturally due to the quality of your articles and the automatic display and contextual of advertisements, your references, and your works for sale next to each article.
Blogger is an online service acquired by Google for creating a blog fully managed by one or more users. This service has become the preferred choice for any novice bloggers for its simplicity, reliability, flexibility, and especially for its gratuitousness. It's a simple tool, benefiting from automatic referencing by Google, allowing very quick SEO to your blog. In other words, your blog is more likely to appear soon in the first links of research when keywords of your own business are typed in Google search.
The edition of the blog is always organized in the same way: A homepage containing articles, and
pages that can appear either in tabs at the top of the blog or on the border, according to your choice.
The blog menu: tabs (these are the pages)
The right side: "Widget" allows you, for example:
o Set a translator of your blog
o Links to other sites
o A Search field
o Visitors Statistics
o A calendar...
How to create the blog:
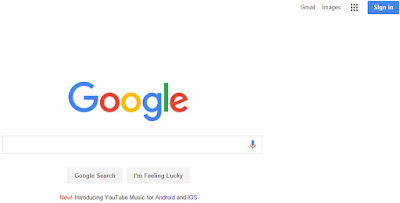
You must first create an account on Google. Open google.com. At top right, a blue button ''Sign in'' click it then choose ''Create Account''.Fill in the required fields.
By creating a Google account, you can access all Google tools: mailbox yourmail@gmail.com, access to Blogger to create a blog, Google +, Google DRIVE (which allows you to share documents online).
- Now go to Blogger.com, log in using your Google account, confirm your profile when asked then clic ''New Blog'':
- You'll be asked for a blog title. This title will appear in the header of your blog. You can change it at any moment. Below, an address is required.It's : The URL of your blog (internet address) or the "domain name" of your blog.
Once chosen, it may not be changed. For example : Http://yournewblog1.blogspot.com/
The chosen domain name suffix is yournewblog1
Blogspot.com means you are hosted for free by "blogspot" until you decide to change your hosting provider, i'll show you how to get a custom domain name yournewblog1.com later.
- You can choose what you want in the domain address, and enter it in the field: Address. The
domain name can take different forms:
yournewblog1
your-new-blog1
your.new.blog1
Spaces, capital letters, and punctuation other than hyphen '' - '' and point '' . '' are not allowed.
Important:
When you fill out the address field, if the domain name is already taken, a yellow square appears just below the field to indicate that you have to find another one because it is already taken.
Dashboard:
It allows you to configure your blog. You'll be able to create pages, posts, change the layout, add gadgets, edit graphics, template and settings. For example, to create a post, you can click on the orange button ''new post'' or click on the ''pencil'' button.At any time you can have a visual of your blog by clicking "View Blog".
Menu:
It allows you to manage everything on your blog. For now, let's look at the basics.
- Create ''posts'' that will occupy the blog homepage.
- Create ''Pages'' that can be on tabs or on side of your blog.
- Manage Layout: This section allows you to:
o Change the blog icon: The favicon
o Modify the bottom
o Add / Remove Gadgets (Widget)
o Manage footer
- Manage Templates:
o Change the model at any time
o Customize your Blog
o Change the width, the layout
o Change the font, color, background, total content of the blog.
- Settings:
o Change the blog title
o Its description
o Change settings specific to your blog
o Insert a "meta tag" description to reference each post of your blog
o Finally, in ''Other'', you can delete the blog.
Post Settings:
- Labels: Can add keywords to each post you create. It'll be at the bottom of each post and can inform visitors about the subject.
- Schedule: Allows you to set the time and date of each page or article you create. So if you want to reposition a post which no longer appears on the home page, changing the date you made back on timeline.
- Permalink: This is the URL of your page or post, as it'll appear on the internet. This allows you to quickly obtain the link to your post or your page then share or invite people to visit, without going through the visual.
- Location: If you create a post or a page with an event location and time, it is possible to indicate the geographical locality.
- Options: To allow or not allow, show or no reader comments.
How to use a custom domain name for my blog?
yournewblog1.com without ''Blogspot'' ! Having your own domain name allows you to:- Have a shorter address: tellmh.blogspot.com > http://hoezaay.blogspot.com /">hoezaay.blogspot.com
- Better retained.
- More professional and more credible, thus more successful !
Before you move your blog to a custom domain, you need to have already purchased a custom domain from another provider. There are many companies you can buy domain names from, but i suggest you:
* Hostgator (5.99$ / year) or email me from http://hoezaay.blogspot.com /p/contact-us.html" target="_blank">HERE to get an Exclusive offer of 0.99$ / year !
* Godaddy (8.99$ / year) or email me from http://hoezaay.blogspot.com /p/contact-us.html" target="_blank">HERE to get an Exclusive offer of 0.99$ / year !
After you've purchased your custom domain, follow the steps below (as described by Google):
- Now that you have found your new template for your blog, just follow these few steps to install it in your blog, it does not take more than a minute.
- Go on your Blog Dashboard: > Templates > Backup / Restore
- Click "Browse" button, a window will allow you to search your template: Choose the file that contains your template, the XML file. Double-click it and click on the orange button "Upload":
What can you earn with AdSense? For a blog with about 1,000 page views per day, you can reach daily revenues of 1 to 3 $US.
Learn about it on http://hoezaay.blogspot.com /2015/06/how-to-make-money-throught-your-website.html" target="_blank">How to Make Money Using Affiliate Marketing on your Blog
We're done here, you can start the experience and share it with us! Don't hesitate to ask questions on comments below :)
After you've purchased your custom domain, follow the steps below (as described by Google):
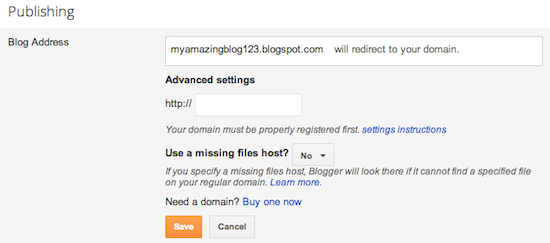
- Go to your blog and click on Basics under the Settings tab. In the "Publishing" section, click the link to add a custom domain.

- Type the url of the domain you've purchased, keeping in mind that it must begin with www in order to work.
- Click Save.
- You should see an error, and two CNAMEs listed below. Each CNAME is composed of two parts - Name, Label or Host and Destination, Target or Points to. The first CNAME is the same for everyone, Name being "www" and Destination "ghs.google.com." The second CNAME is particular to your blog and your Google Account, and is therefore different for each person.
- Go to your domain registrar's website and locate the DNS (Domain Name System) settings in the control panel.
- Now it's time to enter the CNAMEs. Where it says Name, Label or Host simply enter "www" and list ghs.google.com as the Destination, Target or Points to.
- Now enter the second CNAME in the same way.
- Optional: You can also enter A-records, which links your naked domain (example.com) to an actual site (www.example.com). If you skip this step, visitors who leave off the "www" will see an error page.
- Optional continued: After completing Step 8, enter your domain name in the format example.com, and list the I.P. addresses shown below in the "A" section. You'll need to create four separate A-records which point to four different Google IPs. 216.239.32.21
216.239.34.21
216.239.36.21
216.239.38.21
End of optional section - Before you move onto the final step, wait about an hour for your DNS settings to activate. If you attempt the final step before your settings are activated, we'll let you know with a warning message.
- After your settings have been activated, you need to make sure Blogger knows about your custom domain so that Google can direct readers to your blog. Just head back to Blogger and update the information on your Settings | Basic tab. Find the area for "Publishing," and click the link to add a custom domain.


- If your new domain isn't taking you to your blog, wait another day or two to make sure all the DNS servers have been updated. If it still isn't working, contact your registrar to make sure you entered the DNS settings correctly.
- Your original Blogspot address will automatically forward to your new domain. That way, any existing links or bookmarks to your site will still work.
- Your posted images will continue to display on your blog.
How to Design and Customize Your Blog:
Designing a complete blog template is not an easy task, you'll need hight HTML and CSS skills! If you are unfamiliar with HTML and CSS or just wish to save your time, there's a very large high quality Blog templates on CodeCanyon.com (starting from 2 $US only!)- Now that you have found your new template for your blog, just follow these few steps to install it in your blog, it does not take more than a minute.
- Go on your Blog Dashboard: > Templates > Backup / Restore
- Click "Browse" button, a window will allow you to search your template: Choose the file that contains your template, the XML file. Double-click it and click on the orange button "Upload":
How to start making money with your Blog:
Now let's take a look at top tools to make money with your blog, several sources of income exist and you can earn from few cents to several hundred dollars depending on your Blog traffic !1. Advertising:
Contextual ads or banners appear in your content. You will be paid per click or number of views. The easiest way for a blogger is to install Google AdSense.What can you earn with AdSense? For a blog with about 1,000 page views per day, you can reach daily revenues of 1 to 3 $US.
If you can't get AdSense approval (for many reasons) you can try one of the best Google adsense alternative: RevenueHits , instant approval and an highest eCPM program!
2. Affiliation:
If traffic to your blog is very important, you can use Affiliate links . Receive a commission on sales made through a link on your site.Learn about it on http://hoezaay.blogspot.com /2015/06/how-to-make-money-throught-your-website.html" target="_blank">How to Make Money Using Affiliate Marketing on your Blog
We're done here, you can start the experience and share it with us! Don't hesitate to ask questions on comments below :)


Tidak ada komentar:
Posting Komentar